In this tutorial, we are going to create an image classifier to classify cats and dogs with more than 80% accuracy. I did this project when I was in the final year of my computer science degree. Today, I’ll walk you through the entire project so that you can also do it.
You don’t need to be an expert coder to do this project. If you know Python fundamentals, you can create your first image classifier pretty easily.
Before we jump right in, we will look at some basic concepts of image classification. Then, we will move to the coding part.
What is Image Classification?
Consider an example:
A 3-year-old baby is an expert in classifying things. The baby can identify its mom, dad, relatives, toys, food, and many more. How did the baby get all the knowledge?
Actually, this is by training. The baby saw various things for the first time and could not understand what they are. But after seeing them several times and getting inputs from people around, the baby has become a pro in classifying everything.
The computer is like a newborn baby. It does not know the difference between a cat and a dog. But we know it. So, let’s help the computer to identify cats and dogs correctly.
We will be using the Python programming language to give instructions to the computer.
Hopefully, the computer will be able to distinguish between cats and dogs by the end of this tutorial.
Our Action Plan
Let’s do a quick overview of what we are going to do. We need to collect lots of images of cats and dogs.
Then, we need to put all the cat images in a folder and tell the computer: ”These are all cats, go through all of these images and learn as much as you can”.
We will do the same with the dogs. Finally, we will test whether the machine obeyed us or not.
Setup
Before you start creating the image classification model, make sure you have all the libraries and tools installed in your system. You can refer to this article for setting up your environment for doing this image classification project.
Cats and Dogs Data Set
Our first task is to find a lot of images of cats and dogs. Good news!. Someone has already done that for you. Go to this link, and you can download the data set.
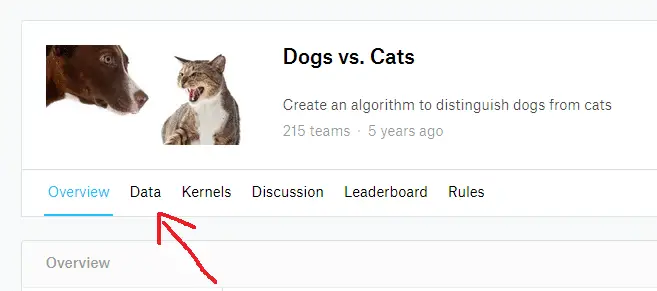
You will see a page like this. Click on the Data tab. Scroll down below, and you will see a link that says Download all.
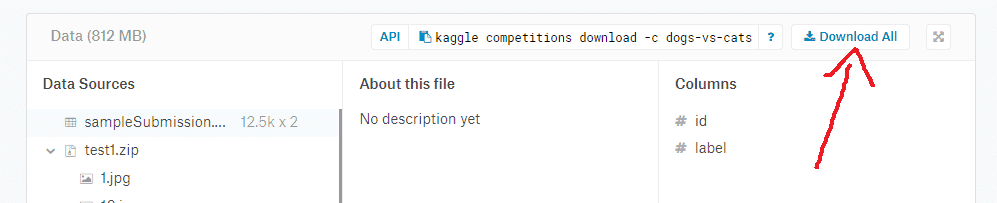
You need to have a Kaggle account to download these files. So sign up there and reload this page again to download the data set.
The file is of size more than 800 MB. Download the zip file and extract it. You will see two folders inside the main folder, which are test and train.
Preparing the Data Set
There are some issues with the data set. The folder test is not labeled, and we don’t want that. So, go ahead and delete the folder test. Don’t worry. We will create a new test folder.
Now we have only the train folder. Inside that, we have two child folders called cats and dogs. Each folder contains 12500 images.
Now, come back to the parent directory if you are completed watching some cute images. Let’s create a new folder and name it as test.
Inside test, we need two folders, which are cats and dogs. As of now, these folders are empty. So we need to add some images to these folders.
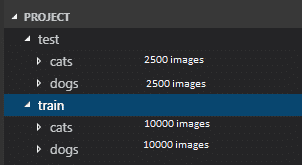
We will go to train -> cats, and cut 2500 images of cats, and paste it inside test -> cats. Do the same with dogs as well.
Our test and train folders are ready. This is how our data set looks like:
Our data set is ready. Now, we can start coding our image classification model.
Keras Library
We are going to use the Keras library for creating our image classification model. Keras is a Python library for machine learning that is created on top of tensorflow.
Tensorflow is a powerful deep learning library, but it is a little bit difficult to use, especially for beginners. Keras makes it very simple. So, we will be using keras today.
Creating the Image Classification Model
Let’s start with the coding part. We will learn each line of code on the go. First things first, we will import the required libraries and methods into the code.
from keras.models import Sequential
from keras.layers import Conv2D,Activation,MaxPooling2D,Dense,Flatten,Dropout
import numpy as np
These are the things that we need. Conv2D, Activation, MaxPooling2D, Dense, Flatten, and Dropout are different types of layers that are available in keras to build our model. We need several layers for our model since we are using deep learning.
Let’s initialize a convolutional neural network using the sequential model of keras.
classifier = Sequential()There are two ways to build keras models, which are Sequential and Functional. We are using sequential here to build our model. The sequential API helps us to create models in a layer-by-layer format.
Now we have a convolutional neural network (CNN). CNN is a class of deep learning networks, which is most commonly used for image processing and image classification purposes.
CNN has several layers. So, let’s add some layers to our classifier.
Convolutional Layer
classifier.add(Conv2D(32,(3,3),input_shape=(64,64,3)))So, we added a convolutional layer as the first layer. Conv2D stands for a 2-dimensional convolutional layer.
Here, 32 is the number of filters needed. A filter is an array of numeric values. (3,3) is the size of the filter, which means 3 rows and 3 columns.
The input image is 64643 in dimensions, that is, 64 height, 64 widths, and 3 refer to RGB values. Each of the numbers in this array (64,64,3) is given values from 0 to 255, which describes the pixel intensity at that point.
The output of this layer will be some feature maps. The training images will go through this layer, and we will obtain some feature maps at the end of this layer. A feature map is a map that shows some features of the image.
Now, let’s create the next layer.
Activation Layer
Let’s pass the feature maps through an activation layer called ReLU. ReLU stands for the rectified linear unit. ReLU is an activation function.
An activation function of a neuron defines the output of that neuron, given some input. This output is then used as input for the next neuron, and so on until the desired solution is obtained.
classifier.add(Activation('relu'))ReLU replaces all the negative pixel values in the feature map with 0.
Now, let’s add the next layer.
Pooling Layer
Pooling helps to reduce the dimensionality of each feature map and retains the essential information.
This helps to decrease the computational complexity of our network.
classifier.add(MaxPooling2D(pool_size =(2,2)))Here, we used max-pooling with a 2*2 filter. The filter will take the max values from each pool.
A classic convolutional neural network has 3 convolutional blocks followed by a fully connected layer. We created the first set of 3 layers. We can repeat this twice more.
classifier.add(Conv2D(32,(3,3)))
classifier.add(Activation('relu'))
classifier.add(MaxPooling2D(pool_size =(2,2)))
classifier.add(Conv2D(32,(3,3)))
classifier.add(Activation('relu'))
classifier.add(MaxPooling2D(pool_size =(2,2)))
Dropout
To prevent overfitting, we use the dropout layer in our model. Overfitting is a modeling error that occurs to make an overly complex model. This layer drops out a random set of activations in that layer by setting them to zero as data flows through it.
To prepare our model for dropout, we first flatten the feature map to 1-dimension.
classifier.add(Flatten())Then we want to initialize a fully connected network by using the Dense function and applying the ReLu activation function to it.
classifier.add(Dense(64))
classifier.add(Activation('relu'))
Finally, let’s add the dropout layer.
classifier.add(Dropout(0.5))After dropout, we’ll initialize 1 more fully connected layer. This will output an n-dimensional vector, where n is the number of classes we have (2 in this case).
classifier.add(Dense(1))We need to apply a sigmoid activation function to our model so that it will convert the data into probabilities for each class. A sigmoid function is a mathematical function having an S-shaped curve or sigmoid curve.
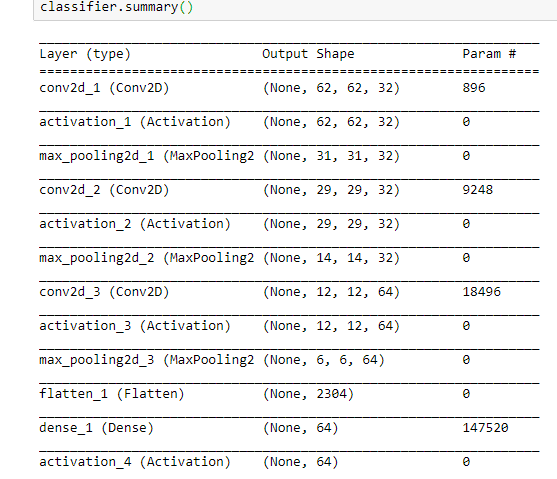
classifier.add(Activation('sigmoid'))That’s it with building our classifier model. Now, we have a CNN model with several layers in it.
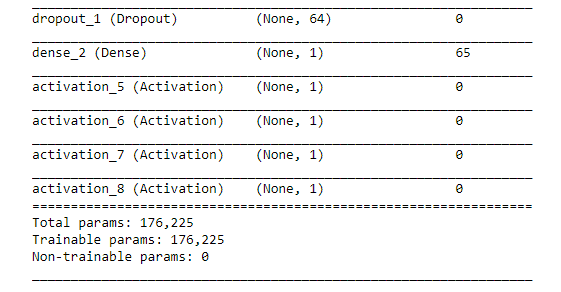
Let’s do a summary of our classifier model. This is how the model looks like.
Compiling the Model
We have a pretty good model now. Before we train our model with all the images, we have to compile the model. There is a specific method for that in keras, which is compile().
classifier.compile(optimizer ='rmsprop',
                   loss ='binary_crossentropy',
                   metrics =['accuracy'])
Optimizer rmsprop will perform gradient descent for this model. Gradient descent is actually an optimization algorithm that helps to find the minimum value of a function.
The binary_crossentropy is the best loss function for binary classification problems. A loss function, also known as cost function, is a measure of how well a prediction model can predict the expected outcome.
We also set the metrics to accuracy so that we will get the details of the accuracy after training.
Data Augmentation
Data augmentation is required before we train the model to reduce overfitting. Data augmentation means increasing the number of images in the data set.
So, we will flip, zoom, and do a lot of things with all the existing data set images, so that the machine will get a variety of types of images to study.
For that, we will import the ImageDataGenerator method from the keras library.
from keras.preprocessing.image import ImageDataGenerator
train_datagen = ImageDataGenerator(rescale =1./255,
                                   shear_range =0.2,
                                   zoom_range = 0.2,
                                   horizontal_flip =True)
test_datagen = ImageDataGenerator(rescale = 1./255)
We set these parameters so that the machine will get trained with the images at different positions and details to improve the accuracy.
Setting Train and Test directories
Before we train the model, we need to set the train and test directories. Keras has a method called flow_from_directory() method.
training_set = train_datagen.flow_from_directory('C:/Users/Lab/Project/train',
                                                target_size=(64,64),
                                                batch_size= 32,
                                                class_mode='binary')

test_set = test_datagen.flow_from_directory('C:/Users/Lab/Project/test',
                                           target_size = (64,64),
                                           batch_size = 32,
                                           class_mode ='binary')
After we run this cell in our notebook, the machine will say that it has found the images in our data set.

Training the classifier
Finally, it’s time to train the model. We have done a lot of things to make our model and data as perfect as possible. Now, let’s see how we can train this image classification model.
For this purpose, we need two more methods. One is the display method from the IPython.display package and the other one is Image from the PIL library (Pillow library).
We will train the model using the fit_generator() method of the keras library.
from IPython.display import display
from PIL import Image
classifier.fit_generator(training_set,
                        steps_per_epoch =625,
                        epochs = 30,
                        validation_data =test_set,
                        validation_steps = 5000)
Here, we passed the training_set as the first parameter of the fit_generator() method. I put the steps_per_epoch as 625 and epochs as 30.
There are no perfect epochs and steps_per_epochs so that we can use the values in every model. These two values change for different models and different data sets.
Generally, we find the best values for our model by trying many values many times and taking the best values from them.
Then, we passed the test_set as the validation_data and set the validation_steps to 5000.
Let’s run this cell and as you can see, this will take a lot of time to train the classifier. So, if you want fast results, reduce the epochs and steps_per_epochs to some lower values.
As these values become larger, the longer it will take the machine to learn everything. But the longer it takes, the better will be the accuracy.
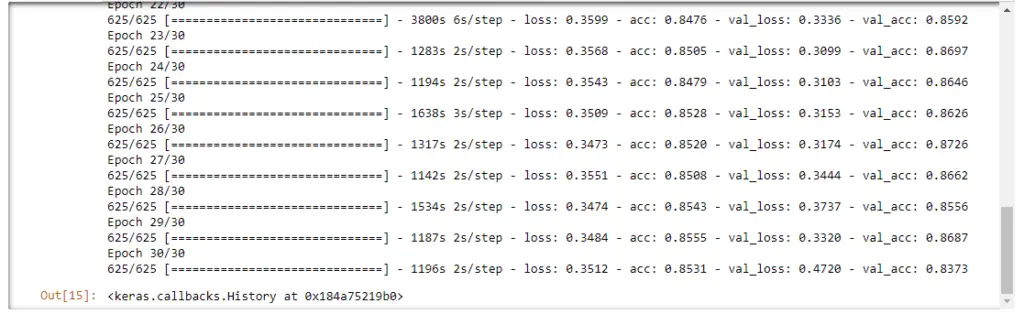
As you can see, I got a validation accuracy of 83.7%.
If you took a lot of time and finally completed training your model successfully, well done. Sometimes, it takes a lot of patience to do this.
You have patiently trained your model, and now, you must save this model if you want to use this model in the future.
Otherwise, for testing the model a few days later, you will need to train the whole model again from start. That is ridiculous.
So, as soon as you finish training the model, save it. Let’s see how we can do this. It is pretty simple.
Saving the trained model
To save the trained model, we need to use a keras method called save(). Simple as that.
classifier.save('catdog_cnn_model.h5')This line of code will create an HDF5 file with the name catdog_cnn_model. When we want to use this model later, we just need to load this saved model into our code.
There is a method called load_data() for doing this purpose. We first need to import this method from keras.models package.
Then we can load the model, and use it for testing without wasting any time training the model.
from keras.models import load_model
classifier = load_model('catdog_cnn_model.h5')
Testing the classifier
Finally, let’s see how much did the machine learn. We will test the model by giving some random images of cats and dogs to the model. Let’s see whether the machine will be successfully able to identify which one is a cat and which one is a dog.
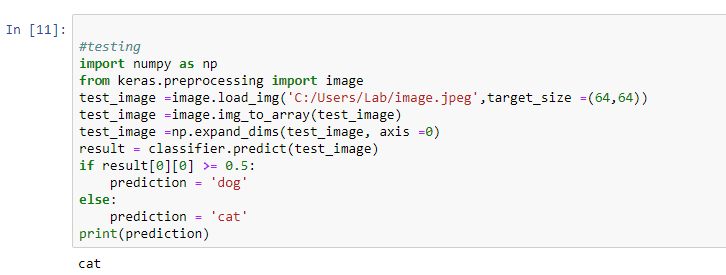
I just gave a random image to the model by using the load_img() method. This image is then converted to an array of numbers using the to_array() method.
Then it expanded its dimensions using the expand_dims() method, to help the machine predict pretty well.
Finally, we passed this image to the predict() method of the keras library. The machine will quickly process the image and identify whether it is a cat (value 1) or a dog (value 0).
import numpy as np
from keras.preprocessing import image
test_image =image.load_img('C:/Users/Lab/image.jpeg',target_size =(64,64))
test_image =image.img_to_array(test_image)
test_image =np.expand_dims(test_image, axis =0)
result = classifier.predict(test_image)
if result[0][0] >= 0.5:
    prediction = 'dog'
else:
    prediction = 'cat'
print(prediction)
The computer is now an expert in classification. It just predicted the result correctly.
I downloaded 5 high-quality images of cats and dogs from pexels.com and tested the model using all these images. My classifier did a pretty good job actually.
It classified 8 images correctly, and 2 of its predictions were wrong. Still, that is a pretty good accuracy.
Conclusion
We have successfully created an image classifier using deep learning with the keras library of Python.
Our image classifier predicted the results with an accuracy of 83.7 percentage.
How did your image classifier perform? I’m curious to know about how perfectly your classifier predicted cats and dogs. Let me know the details in the comments section.
I spent a long time making this article. I would appreciate it if you would be willing to share it. It will encourage me to create more useful tutorials like this.
Happy coding!
20 thoughts on “Cats and Dogs Image Classification Using Keras”
Leave a Reply to Ashwin Joy Cancel reply
Recent Posts
Modular programming is a software design technique that emphasizes separating the functionality of a program into independent, interchangeable modules. In this tutorial, let's understand what modular...
While Flask provides the essentials to get a web application up and running, it doesn't force anything upon the developer. This means that many features aren't included in the core framework....

Very nice articles . Good job bro.
Would you make regresion type of deep learning.
Thanks .
Thank You, I appreciate it. I’ll try to add articles about the topic.
Nice Article, Keep it up.
could you add a block for creating a confusion matrix
Thank you
Thanks. I’ll try to add some content about the confusion matrix once I get time. However, you can have a look at this article: https://datatofish.com/confusion-matrix-python/
I hope this tutorial could help you.
I have a question; why the number of filters is 32? Thanks.
The number of filters is the number of neurons present in CNN. It is a hyper-parameter that can be tuned. The number of neurons in a convolutional layer is equal to the size of the feature map (A feature map is a result of applying a filter).
There is no correct answer as to what the most suitable number of filters is. It strongly depends on the type and complexity of your data. After working with similar types of datasets repeatedly over time, we can find out the best number of filters.
In general, the more features you want to capture in an image, the higher the number of filters required by a CNN. You can experiment with some other number of filters and see how it affects accuracy.
This is really awesome. But how to recognize cats / dogs and filter it out from everything else like e.g. trees/cars/doors and so on?
Machine learning models look at each pixel of an image. Hence, they can identify a cat or a dog from the pixel values that are similar to what they have already learned.
Thank you for your tutorial. You have tested your prediction on a single image, I would like to know the case or I would like to test a data set that contains 1000 images. How should I proceed?
That’s what we’ve done by creating a test folder. There we’ve got a bunch of images for the testing purpose. If you want to test a folder full of images, give the path of that folder as the test_set (check out Setting Train and Test directories). You might need to wait until the training is complete, and you will be able to see the validation accuracy at the end. Thanks for the comment.
My model trained when i am try to save you said that it will HDF5 file with the name catdog_cnn_model.
where can i see this file. if i am writing this code on jupyter note book.
when i am trying to test the model with your code.it is saying like this
————————————————————————–
FileNotFoundError Traceback (most recent call last)
in
1 import numpy as np
2 from keras.preprocessing import image
—-> 3 test_image =image.load_img(r”C:\Users\srikanth\Desktop\image.jpeg”,target_size =(64,64))
4 test_image =image.img_to_array(test_image)
5 test_image =np.expand_dims(test_image, axis =0)
~\Anaconda3\envs\PythonCPU\lib\site-packages\keras_preprocessing\image\utils.py in load_img(path, grayscale, color_mode, target_size, interpolation)
108 raise ImportError(‘Could not import PIL.Image. ‘
109 ‘The use of `load_img` requires PIL.’)
–> 110 img = pil_image.open(path)
111 if color_mode == ‘grayscale’:
112 if img.mode != ‘L’:
~\Anaconda3\envs\PythonCPU\lib\site-packages\PIL\Image.py in open(fp, mode)
2807
2808 if filename:
-> 2809 fp = builtins.open(filename, “rb”)
2810 exclusive_fp = True
2811
FileNotFoundError: [Errno 2] No such file or directory: ‘C:\\Users\\srikanth\\Desktop\\image.jpeg’.
But i have the image in the above mentioned path.
The saved model would probably be in the same folder. However, check and verify whether it is saved in the same folder or somewhere else.
I’m not sure why the image isn’t loading in your specific case. You’ll be able to troubleshoot it if you do some research on the Internet. Thanks.
The program is good and runs also. But one query..
The kaggle dataset images are actually bigger in size and varying sizes like 500×374, 415x 499 etc.
But we are taking input size as 64 x64x3 only. How? Are we taking only 64 x 64×3?
The input shape parameter will change the dimensions for fine-tuning with keras.
Check out this article to learn more about input shape dimensions in keras: https://www.pyimagesearch.com/2019/06/24/change-input-shape-dimensions-for-fine-tuning-with-keras/
check the size of your image
how will we test the classifier if there is more than two classes and how did you take the value 0.5 in this
“if result[0][0] >= 0.5:
prediction = ‘dog’
else:
prediction = ‘cat’
print(prediction)”
The ideal outputs should be 0 and 1 for dogs and cats respectively. So, if the predict() method returns a value which is closer to 0 (less than 0.5), we can consider that as a dog. Otherwise, we can consider it a cat.
You can read this article to see how you can classify more than two classes: http://pythonistaplanet.com/cifar-10-image-classification-using-keras/
It’s hard to say
Thank you Ashwin, this was a fantastic article and extremely approachable, even for the amateur.
Glad it helped.