Python’s versatility makes it compatible with a wide range of applications. I highlighted in my post ‘10 Exciting Advantages of Python‘ that it accommodates a variety of libraries and frameworks. This means it works with different database platforms.
Python has a native driver for MongoDB, which is a widely used NoSQL database. In this guide, you will learn how to connect Python with MongoDB, create a database, insert data, and other fundamental operations using these.
Note that this guide assumes you already have MongoDB installed on your computer and you have a MongoDB Atlas account. If not, you may visit their website to download the necessary files.
With all of that cleared, we can begin our MongoDB database tutorial.
Step 1
You need to enable PyMongo on your machine. It’s the official Python driver for MongoDB and lets you interact with the database using this language. To activate PyMongo in the Python prompt, use the pip command.
Enter the line below:
pip install pymongo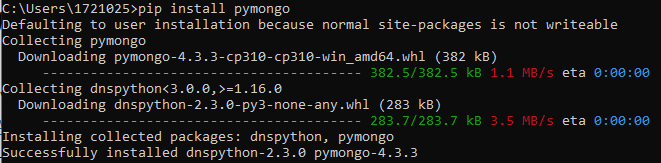
Step 2
Open the Python editor in your command prompt or terminal. You can also create a separate Python file to write the code if you want.
Create a connection to MongoDB by importing the PyMongo library and creating a MongoClient instance. Then connect on the default host and port by passing the connection string. The connection string contains the server address, port number, and other optional parameters. 27017 is the default port for MongoDB.
Use the following lines:
from pymongo import MongoClient
client = MongoClient()
The above code creates a connection to the default host (localhost) and port (27017).

You can also specify your custom host, port, and other connection parameters if you want.
client = MongoClient(host="localhost", port=27017)Another way to do the same thing is by using the MongoDB URI format.
client = MongoClient("mongodb://localhost:27017")Step. 3
Next is to create your database. To build a Python database with MongoDB, you can either use the MongoDBCompass GUI or write Python code for the same.
To create a new database named “dbwithpython“, use the following in your database.py file:
client = MongoClient()
db = client['dbwithpython']
Step 4
Now you need to create a collection, which is an instance of Collection. It represents a physical collection of documents in your database. To create a new collection called “mycollection” in your database, enter the lines below:
mycollection = db.mycollection
Step 5
Set and manage users and roles via the create_user(), update_user(), and delete_user() methods. For instance, to create a new user with read and write permissions on the dbwithpython database, use the following:
client.admin.command('createUser', 'pymongo_user', pwd='password', roles=[{'role': 'readWrite', 'db': 'dbwithpython'}])To update a user’s password, use update_user():
client.admin.command('updateUser', 'pymongo_user', pwd='password2')To delete a user, use delete_user():
client.admin.command('dropUser', 'pymongo_user')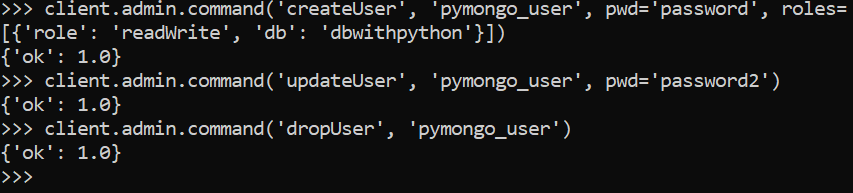
Step 6
After your database and collection are set up, use the insert_one() method to add documents. The insert_one() method takes a dictionary as an argument, which represents the data to be inserted. To insert a new user in mycollection with a name, age, and email:
user = {'name': 'Bob', 'age': 45, 'email': 'bob@pythonistaplanet.com'}
result = mycollection.insert_one(user)
In addition to inserting a single dataset, you may also add multiple random entries in your MongoDB database simultaneously.
Step 7
To work with data in your MongoDB database, use functions that execute actions such as find, update, and delete.
First is the find() method. This operation returns a cursor object that you can iterate over to get the matching documents. For example, to find all data in mycollection, use the code below:
for data in mycollection.find():
print(data) 
For updating data, you may use the update_one() method. This takes two arguments: a filter that specifies the document to update, and an update operation that specifies the changes to make. Say you need to change Bob’s email:
mycollection.update_one({'name': 'Bob'}, {'$set': {'email': 'newbob@pythonistaplanet.com'}}) 
As for removing data, you may use delete_one() or delete_many(). The delete_one() option takes a filter as an argument, which specifies the document to delete. Use the lines below to delete a document with the name “Bob” from mycollection:
result = mycollection.delete_one({'name': 'Bob'})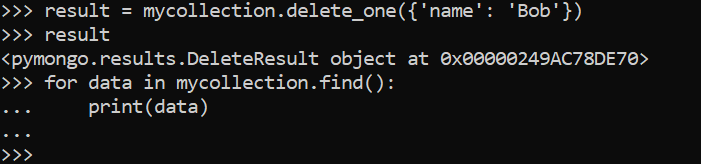
This method will return a DeleteResult object that contains information about the deletion operation, such as the number of documents deleted.
To delete multiple documents that match a specific filter, you can use the delete_many() method. The delete_many() method takes a filter as an argument, which specifies the documents to delete.
Take for example a requirement to delete all documents with an age greater than 30 from mycollection.
result = mycollection.delete_many({'age': {'$gt': 30}})The delete_many() method also returns a DeleteResult object that contains information about the deletion operation, such as the number of documents deleted.
Note that when you delete a document or multiple documents using the delete_one() or delete_many() methods, the operation is permanent and cannot be undone. Be sure to double-check your filters before deleting any data from your database.
To delete a database, you can use the drop_database() method of the MongoClient() class. The drop_database() method takes the name of the database as an argument. For example, to delete your dbwithpython database, you can use the following code:
client.drop_database('dbwithpython')
If you need to delete a collection, use the drop() method of the collection object. The drop() method does not take any arguments. To delete mycollection, simply use:
db.mycollection.drop()That’s it. Now that you learned the fundamentals of using Python with MongoDB, you may start practicing how to build applications. Check out some Python project ideas that can help point you in the right direction.
Thanks for reading. Happy coding!
Recent Posts
Modular programming is a software design technique that emphasizes separating the functionality of a program into independent, interchangeable modules. In this tutorial, let's understand what modular...
While Flask provides the essentials to get a web application up and running, it doesn't force anything upon the developer. This means that many features aren't included in the core framework....
