We all know ChatGPT is powerful and can do many things. You might have probably used ChatGPT at least a few times before coming to this article. But have you ever tried to integrate ChatGPT with Python code? If not, let’s do it today.
If you don’t know what ChatGPT is, ChatGPT is an AI language model developed by the company OpenAI. In this post, we will see how to use ChatGPT with Python. Don’t worry, I will share the step-by-step instructions and sample code.
Let’s dive right in.
Step 1 – Install Required Packages
I assume that you already have Python3 installed in your system.
To use ChatGPT with Python, we need to install the openai package first. Open your terminal or command prompt and install the package using pip.
pip install openaiMake sure that your system is connected to the Internet. This command will install the openai package in your system.
Step 2 – Create an OpenAI Account
The next step is to create an account on the OpenAI website to get the API key. If you already have an account on the OpenAI website or ChatGPT website, you can use that account. Otherwise, you can sign up for a new account.
Go to this link and log in to your account (sign up first and then log in if you don’t have an account).
Once you log in, you can generate an API key for your account.

Now make sure you keep a copy of this API key somewhere.
When you create an OpenAI account, the platform will give you some free credits to use. You can see the available free credits and the expiration date by going to the Usage tab on the website.
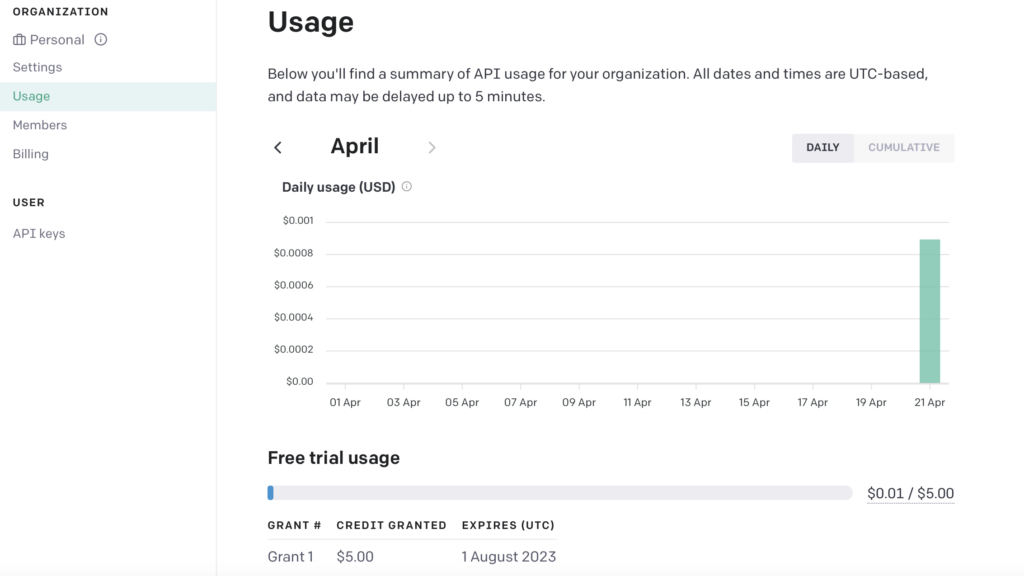
As of now, you can use the API for free till the expiration date. If you want, you can add a payment method later and get as many credits as you want.
Now that we have an OpenAI API key ready, let’s go ahead and write some Python code.
Step 3 – Initialize OpenAI API Client
Now open up your favorite code editor and create a new Python file. Import the openai module and use the openai.api_key function to set the API key.
import openai
openai.api_key = "YOUR_OPENAI_API_KEY"
Make sure to replace YOUR_OPENAI_API_KEY with your actual API key.
Step 4 – Define the Conversation List and System Message
Our plan is to create a chatbot that talks to the user. To keep track of the conversation, let’s create a list called ‘conversation’. We will also define a system message that sets the behavior of the chatbot.
conversation = []
system_message = "You are a helpful assistant."
Step 5 – Create the Chatbot Loop
To keep the chatbot running until the user decides to end the conversation, we create a while loop.
while True:Step 6 – Read User Input
Read the user input from the console and add it to the conversation list.
user_input = input("You: ")
conversation.append({"role": "user", "content": user_input})
Step 7 – Set Up the Messages Parameter
We have to set up the messages parameter for the API call. This parameter is a list of dictionaries that contain the conversation history.
It starts with the system message, and then the user’s input and any previous messages in the conversation list.
messages = [{"role": "system", "content": system_message}] + conversationStep 8 – Generate a Completion Using the OpenAI API
We can now generate a response using the OpenAI ChatCompletion API. To do that, pass the model parameter to specify the version of ChatGPT we want to use.
In this tutorial, we use the gpt-3.5-turbo model. We also need to pass the messages parameter that we just defined.
response = openai.ChatCompletion.create(
    model="gpt-3.5-turbo",
    messages=messages
)
Step 9 – Extract the ChatGPT Reply from the Response
Now let’s extract the response and print it. The response from the OpenAI API has a list of choices. Each choice contains a message and its corresponding attributes.
We can check the response status code to make sure that the API call was successful or not. If the API call was successful, print the assistant’s response. Also, add the reply message to the conversation list.
If the API fails for any reason, we break the loop using the break statement.
if response["choices"][0]["message"]["content"]:
    assistant_reply = response["choices"][0]["message"]["content"]
    print("Assistant:", assistant_reply)

    conversation.append({"role": "assistant", "content": assistant_reply})
else:
    print("Failed to get a response from the ChatGPT API.")
    break
All the steps are done. Now you have a chatbot created using Python and ChatGPT.
Complete Source Code to Use ChatGPT with Python
import openai
openai.api_key = "YOUR_OPENAI_API_KEY"

conversation = []
system_message = "You are a helpful assistant."

while True:
    user_input = input("You: ")
    conversation.append({"role": "user", "content": user_input})

    messages = [{"role": "system", "content": system_message}] + conversation

    response = openai.ChatCompletion.create(
        model="gpt-3.5-turbo",
        messages=messages
    )

    if response["choices"][0]["message"]["content"]:
        assistant_reply = response["choices"][0]["message"]["content"]
        print("Assistant:", assistant_reply)

        conversation.append({"role": "assistant", "content": assistant_reply})
    else:
        print("Failed to get a response from the ChatGPT API.")
        break
Note: Remember to replace YOUR_OPENAI_API_KEY with your actual API key before running the above code.
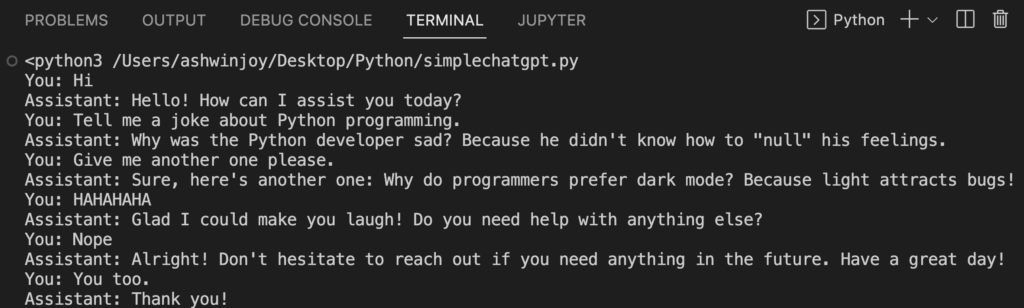
Output:
Final Thoughts
In this tutorial, we have learned how to create a chatbot using Python and OpenAI API. I hope this post was helpful. Now you can take this code, play around with it, and build amazing things by leveraging the OpenAI API.
Thanks for reading. Happy coding!
Recent Posts
Modular programming is a software design technique that emphasizes separating the functionality of a program into independent, interchangeable modules. In this tutorial, let's understand what modular...
While Flask provides the essentials to get a web application up and running, it doesn't force anything upon the developer. This means that many features aren't included in the core framework....
